
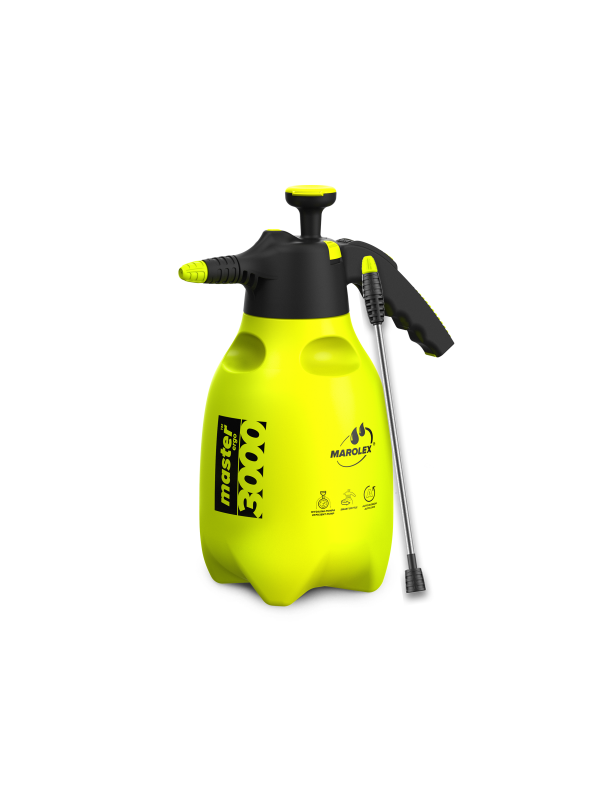
MASTER ERGO 3000 hand pressure sprayer with 30 cm hose


MASTER ERGO 1000/1500/2000/3000 - Pressure hand sprayer
1. USE AND PURPOSE
The spray is intended for the implementation of protective and care measures with aqueous solutions of plant protection products: insecticides, fungicides, weed killers and fertilizers. It is intended for use in greenhouses, as well as in open plantations of vegetables or ornamental plants, as well as on small agricultural areas and gardens.
ATTENTION !!! The use of chemically active agents including acids or bases, disinfectants, impregnating agents, solvent-containing agents, aggressive cleaning agents and petroleum products is prohibited.
The use of the above means can cause damage to the sprayer and lead to lasting health consequences for the user.
2. MASTER ERGO SPRAY PARTS
Sprayer in full: Picture. 1; instructions for use and warranty card. Each sprayer has an additional MR 1.0 nozzle (installed under the yellow cover Fig. 1). We also offer sprayers from the INDUSTRY ergo series, which have VITON and EPDM seals. Marolex Sp. z o.o. reserves the right to make changes to the parts of the sprayer.
3. PREPARATION AND OPERATION OF THE MASTER ERGO sprayer
1. Read the operating instructions before working with the sprayer. 2. Before starting work, check the operation of the safety valve and test the operation of the sprayer with clean water. Fill the sprayer with water, then use the pump Figure 2, press the yellow button of the safety valve Figure 3, the moment you release the valve you will hear a pronounced sound under the pressure of compressed air, which confirms the proper operation of the safety valve. 3. To start the sprayer, it is necessary to completely remove the pressure from the container through the safety valve Figure 3, unscrew / open the lid Figure 4, fill with clean water (only for the first use in order to check the operation), after finding that the sprayer works properly to empty the container. Then fill the container with the chemical solution up to the level indicated on the container Figure 5, turn / close the lid Figure 4 and use the pump Figure 2, point the sprayer in the desired spray direction and start operation by pressing the button Figure 6. Continuous operation of the sprayer is achieved by by pressing the yellow lock button forward Figure 7, and in order to relieve the lock, press the lock button again, this time backwards. During operation, it is possible to change the spray angle by turning the nozzle cover Figure 8. At the end of the operation, it is necessary to release the lock Figure 7. In case of excessive pressure supply, the safety valve opens automatically.
4. OCCUPATIONAL SAFETY REMARKS
1. Children, pregnant women and persons taking medicines or consuming alcohol are not allowed to use the spray. 2. Before spraying for the first time, check the tightness of the sprayer and the operation of the safety valve with clean water. 3. When working with plant protection products (even during the preparation of the solution and the destruction of the packaging), consistently use protective equipment (rubber boots, gloves, coat, hat and mask). 4. It is forbidden to work with chemicals on an empty stomach and to consume food or drink while working. It is forbidden to consume alcohol at least one day before work and at least one day after work with chemicals. 5. It is forbidden to pour liquids into open water sources or biological treatment plants. This note also applies to the water used to flush the pressure sprayer and other parts of the sprayer. 6. The used sprayer must be handed over for disposal to a specialized waste manager. 7. Persons using a pressure sprayer must strictly follow all the recommendations stated on the spray package. In case of poisoning, seek medical attention. 8. It is forbidden to work with a defective spray in which the operation of the safety valve is not adequate or a spray that does not seal. The pressure vessel must be protected against impacts or falls and other mechanical damage. 9. Any interventions may only be carried out on a non-pressurized sprayer. 10. The sprayer must be thoroughly cleaned after each use and before service. 11. It is forbidden to use the sprayer for purposes other than those stated in the instructions for use. 12. It is forbidden to store the sprayer with a filled container or under pressure. 13. The only pressure relief device is the pump installed in the tank - it is forbidden to use other devices for this purpose! 14. It is forbidden to use: water warmer than +40 C and highly flammable substances that could lead to an explosion e.g. gasoline, solvents. 15. Changes to the sprayer or misuse can lead to poisoning of people or animals, environmental pollution, damage to the sprayer or serious accidents. 16. After work, change clothes (clean protective clothing), wash hands, face, mouth and throat and clean nose. 17. Rinse the sprayer several times with water after use. 18. The user is fully liable for damage caused in the event of inconsistent compliance with the instructions. 19. It is forbidden to block the safety valve or make changes to the sprayer, which can lead to permanent damage to the sprayer.
ravja. 20. Before starting work, check the operation of the safety valve. For this purpose, the sprayer must be filled with pressure and the safety valve handle must be pulled (Fig. 3d), and a recognizable sound of released air is heard. 21. It is forbidden to point the spray stick in the direction of the face. 22. The sprayer must be protected from use by unauthorized persons, in particular children, during work and storage. 23. When using other products, first make sure that they are allowed to be used in the sprayer and that they are not harmful to the spray, people and the environment.
A sprayer that is once used for spraying with plant protection products must not be used later for other purposes! !! !!
5. WARRANTY CONDITIONS AND WARRANTY REPAIRS
1. The warranty period is 12 months from the date of purchase and is valid upon presentation of the original invoice. 2. Damaged parts or a spray can be delivered to the importer during the warranty period. 3. Dirty or chemically contaminated sprays will not be accepted under the warranty for repair or replacement. Prior to delivery to the importer, the sprayer must be emptied, rinsed and thoroughly cleaned! 4. Repairs will only be carried out for sprayers that have a valid warranty and upon submission of the original invoice. The warranty is valid only if the user has followed the instructions and followed the purpose of use. 5. Only original Marolex spare parts may be used for repairs carried out by the user at his own risk.
6. In the event that the user finds a hidden defect in the product during the warranty period, the product will be rectified or the product will be replaced within 14 working days from the date of receipt by the importer. 7. The importer may not refuse to replace the product with a new one if the product with a hidden defect has been repaired for the fourth time in a row during the warranty period. 8. Repairs that are part of regular maintenance are not covered by the warranty. 9. The manufacturer and the importer do not accept the warranty if the sprayer has been tampered with, the sprayer has not been stored properly or used improperly. 10. Both the manufacturer and the importer shall not be liable for mechanical damage caused during the use of the consignment through the fault of the user. Replacement of damaged parts is only possible with payment. 11. Warranty repairs must be reported to the importer, who will arrange the repair to the extent of the manufacturer's warranty. 12. The guarantee for the sold goods does not exclude, limit or deny the right of the buyer to exchange the goods insofar as this is not in accordance with the placed order.
6. STORAGE AND MAINTENANCE OF THE PUMP
1. The sprayer must be stored in a place not exposed to direct sunlight and at a temperature higher than + 4 ° C. 2. The sprayer must not be stored with the lock button Fig. 7 triggered, which can cause the lock to malfunction. 3. After finishing work, the sprayer must be disassembled, thoroughly cleaned and protected. 4. For protection, check that the pressure from the sprayer is released. If the sprayer is under such pressure, it is necessary to relieve the pressure by pressing the button Figure 3, then it is necessary to unscrew the nozzle cover Figure 8a, unscrew / open the cover Figure 4, unscrew and remove the pump cylinder Figure 9, remove the pump head cover Figure 10, remove the button , unscrew the cap and remove the pressure roller Fig. 11, lubricate the following parts with silicone grease g: seals d, e and seals on the pressure roller b Fig. 13, check the cleanliness of the sponge Fig. 13f, if it is necessary to rinse it with water. 5. After finishing the work, the sprayer must be assembled according to the following instructions: insert the pressure roller, close the thread Figure 11, install the button Figure 12, install the head cover Figure 10, insert and rotate / close the pressure cylinder Figure 9, install the head Figure 4, turn / close the thread nozzles Figure 8a.
7. ELIMINATION OF SMALL OPERATING FAULTS
Error observed Cause Action
Air leaks during pressure supply The pump head is not closed sufficiently Figure 4
AUTO button blocked
No seal under the pump head Close the pump head more / tighter Figure 4
Release the AUTO button Figure 7
Install the seal
Poor spraying or no spraying, despite the fact that we put enough pressure in the tank Dirty pressure roller and nozzle thread
Dirty tube filter that captures air from the container
Damaged pump roller Open and rinse the thread and pressure roller with water Figure 8a
ATTENTION! Sharp objects must not be used for cleaning!
Open the head Figure 4, rinse the filter with water Figure 13h
Lubricate the pump roller seals Figure 13b, replace the pump roller with a new one if necessary and lubricate with silicone lubricant g
Heavy-duty or stuck pressure mechanism Damaged pump seal Lubricate the pump seals Fig. 13 e or, if necessary, replace the seal with a new one and lubricate with silicone grease g
The pressure section when the container is filled with pressure rises or the liquid leaks out from under the thread of the pressure element. Dirty or worn pump back cover. Rinse dirty parts, replace sponge with new one if necessary. Fig. 13 f
The liquid flows out of the nozzle
Related products

